
Find your snowboard stance
Find out if you ride regular or goofy and how to stand on a board.
Gear guide
Small changes, one at a time
To adjust snowboard bindings, work from the board up: stance width first, then angles, then boot centering, straps and finally the highback. Change one setting at a time, keep your binding manual open, and test each change on snow.
Part of Snowboard bindings
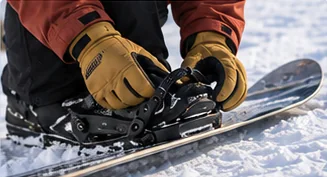
At a glance
Each setting affects the next, so work through them in sequence.
Adjusting snowboard bindings means fine-tuning bindings that are already on the board so they suit your body, your boots and the way you ride. If your bindings are still in the box, start with our guide to mounting bindings on a board, then come back here.
Most adjustments need only a hand screwdriver. Burton’s mounting guide says a #3 Phillips works for most setups and warns against power tools, and Union’s installation guide uses the same screwdriver. Check your own manual, because some adjusters need a different tool or none at all.
| Setting | What it changes | How you usually adjust it |
|---|---|---|
| Stance width | Balance and how easily the board turns | Move the disc or binding to different inserts or along the channel |
| Binding angles | Knee and hip alignment, riding switch | Loosen the disc screws and rotate the binding |
| Boot centering | Toe and heel drag in turns | Shift the binding toward the toe or heel edge |
| Strap length and position | Hold, comfort and pressure points | Move the strap on its slider or mounting holes |
| Highback rotation and forward lean | Heel-side response and leg support | Loosen the highback pivots or use the lean adjuster |
Change one thing at a time. If you move three settings at once and the board feels worse, you won’t know which change caused it.
Stance width is the distance between the centers of your two bindings.
When people talk about how to adjust a snowboard stance, they usually mean three settings: width, angles and setback. Width comes first. To measure snowboard binding width, run a tape measure from the center of the front disc (or the middle of the front binding if you ride channel bindings) to the center of the rear one. That number is your stance width. Write it down before you change anything so you can always return to it.
There is no single correct width. Burton’s guide to snowboard stances suggests starting with your feet “slightly wider than shoulder width”, and Union’s installation guide gives the same starting point, adding that you can “eyeball it” or use a tape and then experiment. Burton’s advice for fine-tuning is simple: widen the stance if you struggle with balance, and narrow it if turns are hard to start.
A quick floor check helps. Stand on the board in your boots on carpet, flex your knees and do a few squats. You should feel stable without your knees pushing inward or your hips feeling pinched.
Burton’s snowboard measurements guide defines the reference stance as the maker’s “standard” stance location, and many boards mark it on the topsheet or around the inserts. Burton’s stance guide adds that this location is either centered or set slightly toward the tail, and that park riders usually avoid setback so the nose and tail stay equal. When you change width, move both bindings by the same amount if you want to keep the same center point.
Setback is how far your stance sits behind the middle of the board. To measure it, find the point halfway between your two binding centers, then compare it with the halfway point of the board’s insert pattern or its reference stance marks. Most boards only let you move back as far as the inserts or channel allow, so check the board maker’s specs for how much setback is possible.
To set up a snowboard for powder, many riders move both bindings back by the same amount, keeping their usual width. Burton’s stance guide explains that this adds surface area in front of the front binding, which gives extra float. Put the bindings back where they were for groomed runs or the park. Technique matters as much as setup, as our powder riding guide explains.
Not sure which foot goes forward? Our regular or goofy stance guide has quick tests to find out.
Angles are written front foot first, in degrees away from straight across the board.
Burton’s binding angles guide explains the notation. Zero means the binding points straight across the board, a positive number means it points toward the nose, and a negative number means it points toward the tail. A setup written as +15/−6 has the front binding turned 15 degrees toward the nose and the rear binding turned 6 degrees toward the tail. Most discs and baseplates have degree markings you line up against a mark on the binding. The spacing varies by brand: Burton’s mounting guide says each tick mark on its discs represents 3 degrees.
Burton describes three common patterns:
If you have no idea where to begin, Burton’s mounting guide calls +15 on the front binding and −6 on the rear “a good starting point for most riders.” Treat any figure like that as a place to start, not a target. Your knees, hips and riding style decide where you finish.
Channel systems work differently: you loosen the binding hardware and rotate the binding within the channel. Follow the manual for your system rather than a general guide.
To center your boots on the snowboard, strap them into the bindings and look at how far your toes and heels hang over each edge. You want roughly even overhang, so neither side digs into the snow when you lean the board over in a turn.
Burton’s binding adjustment guide describes a simple test: tilt the board up on its toe edge, then its heel edge, and see whether your boot touches the floor. Burton says that with the base at a 45-degree angle to the ground there should ideally be no boot contact on either side. If your toes drag, Burton suggests shifting the bindings toward the heel edge in small steps (it gives ¼ inch, or 6 mm, at a time) and testing again.
How you shift depends on the binding: some discs have slotted holes, some bindings have an adjustable heelcup or disc cover, and channel bindings slide across the track. Union’s installation guide lists heelcup and disc-cover adjustments for this job, for example. If centering does not solve the drag, your board may simply be too narrow for your boots. Our binding sizing guide and boot fit guide cover that side of the problem.
Set strap length once at home so you only ratchet on the hill.
Strap length is set with a slider, screw or set of holes where the strap meets the baseplate. Burton’s adjustment guide says the ankle and toe straps should be centered over the ankle and toe of your boot, with at least 1 inch (3 cm) of extra ladder left once they are tightened. If a strap runs out of ladder or leaves a long tail flapping around, move it along its adjuster until it sits in the middle of the range.
Many modern toe straps can sit either over the top of your toes or around the front of the boot like a cap. Union’s installation guide covers both positions (“toe cap vs. over the top”) as separate adjustments. Try each and keep the one that holds your boot down without pressing on your toes. Your manual shows which positions your model supports.
To loosen snowboard bindings on the hill, release the ratchets with the lever. To loosen the fit permanently, lengthen the strap on its adjuster instead. Day-to-day strapping in is covered in our strap-in walkthrough.
Straps, ladders and ratchets are wear parts. Burton’s adjustment guide notes that replacement toe straps, ankle straps, buckles and hardware are available and can be fitted with basic tools. To fix a broken binding part, identify your exact binding model and year, then order replacement parts through the binding maker’s spare-parts or customer support pages. If the binding is fairly new, ask the maker about its warranty before paying for parts. If a baseplate, heelcup or highback is cracked, stop riding the binding until the maker or a shop has checked it; don’t improvise a repair on a structural part.
The highback is the tall plate behind your calf. When you adjust snowboard highbacks, there are two settings to look at: rotation and forward lean.
Burton’s adjustment guide explains that you can loosen the screws on each side where the highback meets the baseplate and twist it so it sits parallel to the heel edge of the board. Burton adds a limit of no more than 30 degrees of rotation. Lining the highback up with the edge can make heel-side turns feel more direct.
Forward lean tilts the highback forward so your knees stay bent. Burton defines a highback at 90 degrees to the board as neutral, or no forward lean. Its setup guide recommends that most beginners use zero forward lean until they have a few days on the mountain, and its adjustment guide describes more lean as an option for aggressive carving on groomed snow.
Adjusters vary by brand. Burton lists tool-free dial and micro adjusters, plus a Step On version that needs a #2 Phillips screwdriver. Union describes the adjuster on the Atlas Pro as a dial you roll “to your desired height.” Set both bindings the same to start, add lean a little at a time, and back it off if your calves or knees tire quickly. Our carving guide explains why some riders like more lean for heel-side turns.
The principles are the same; the parts and tools differ.
Union’s installation guide groups its adjustments as heelcup, disc cover, toe strap position, toe strap length for boot size, toe strap centering, ankle strap centering, highback rotation and highback forward lean. It also reminds riders to mount bindings so the ratchets face the tip and tail: “Don’t put your bindings on backwards.” For the Atlas Pro, Union lists a dial forward-lean adjuster and a choice of disc hardware for 4x4, 4x2 and Channel boards. Other Atlas versions may differ, so check the page or manual for your exact model year.
Burton publishes model-specific instructions on its product manuals page, and its adjustment guide covers straps, forward lean and highback rotation for its current bindings. Step On bindings adjust differently from strap bindings. Burton’s Step On overview, for example, explains that the footbed (Gas Pedal) has numbered settings for different boot sizes, which you change by releasing two tabs near the heel and sliding the footbed forward or back.
We have not reviewed every brand’s manual here, so we won’t guess at their adjusters. The same order still applies: width, angles, centering, straps, then highback. Download the manual for your exact model from the maker’s website, and if an adjuster is stiff or unclear, a snowboard shop can show you how it works.
Common questions
Snug enough that your heel stays down and your boot doesn’t shift inside the binding, but not so tight that your feet ache or go numb. Burton suggests leaving at least 1 inch (3 cm) of spare ladder once the straps are tightened, with each strap centered over the boot.
Angles are written front binding first. Zero is straight across the board, positive numbers point toward the nose and negative numbers point toward the tail. So +15/−6 means the front binding points 15 degrees toward the nose and the rear binding 6 degrees toward the tail.
Burton and Union both suggest starting slightly wider than shoulder width, then adjusting. Widen your stance if you feel unstable and narrow it if turns are hard to start. Measure from the center of one disc to the center of the other so you can repeat the setting.
Burton recommends that most beginners use zero forward lean until they have a few days on the mountain. Add it gradually later if you want quicker heel-side turns, and set both bindings the same to start.
On disc bindings, loosen the disc screws a few turns, rotate the binding to the new degree marking, check your stance width, and tighten the screws evenly again. Channel bindings rotate within the channel. Follow your binding manual for your exact model.
Related guides
Find out if you ride regular or goofy and how to stand on a board.
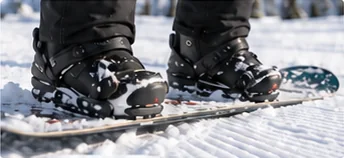
Fasten and release your bindings safely and get a snug, secure fit.
Match binding size to your boots, then check board fit and flex.